Friday, March 15, 2013

Ladybug Ink Blog Hop: Easter Style

My rose bushes are blooming. Green is emerging from the dull, dead New Mexico brown. I can walk outside without a jacket. I'm sneezing liking crazy. Spring is coming! Spring is here!

And you are here! If you have been hopping along, you know that this month's theme is spring/Easter. My project is inspired by Betty Traciak, who came up with a great way to make a cute little Easter basket using the Petite Purse Big Shot die. It's a super easy basket to make and of course, super cute.
 

Isn't the basket adorable. It's super easy to make.

First, you will need to cut six of the upper part of the Petite Purse die. You'll need to cut off the notch on the flap of the purse and the "side" of the purse. Your piece will look like those in the picture below.


Next, add some sticky strip to the remaining flap. Using the red sticky strip gives it the extra strength to stay together.


Attach the six pieces together. Your basket will look kind of like a rainbow! 

Attach the last purse piece to the other side of the "rainbow" and fold the flaps so that they interlock. 
Flip the basket and you have a cute little bowl. Time to make it into an Easter basket!

Cut a 12" piece of DSP and attach it to the inside of the basket to create a handle. I continued to decorate my basket with some Island Indigo ribbon and butterflies from the Spring Sampler stamp set. I made "grass" for my Easter basket by cutting 1/4" strips of Pear Pizzazz and curling them using the bone folder. Now all I need are some Cadbury eggs to place in my basket.


This basket is super easy to make and would make a great teacher gift or just a decoration. I'm planning on putting jelly beans in my basket. Like the amazingly delicious Starburst Jellybeans that are giving me cavities this year.What's your favorite type of jellybean?

Thank you for stopping by my blog. Hop on over to the amazingly talented Cassie to see what she has for you!

Happy Stampin' and Hoppin'!
~Cita


Ladybug Roll Call!
You are Here: Camelita Wasson http://carmenacita.blogspot.com/
Michelle Carrion http://www.ilovecrafttime.blogspot.com/

Friday, March 08, 2013

A Little Bag of Thanks


A few things I love: presents, cards, stamping, my downline, friends....

This cute little bag of note cards represents all those things I love. My downline, and dear friend, Amber gave me this set of cute note cards as a present this past Christmas. A few things struck me when I pulled these out of my gift bag. First, these cards are so cute and simple. Amber used the hostess Happy You stamp set on top World Spectacular DSP. She then colored the cute little mushrooms using Blender Pens.

The second thing that struck me is the joy I felt when I got a handmade present. Along with this cute set of handmade note cards, Amber gave me a jar of handmade hand scrub. I make cards and little presents on a weekly basis. I love giving them to people, but I think I sometimes forget just how much joy and meaning that a handmade gift brings to people. Because of this simple reminder, I made a New Year's goal in January to send or give something handmade to someone every week this year. I've skipped a few weeks, but so far, I've done a good job, and it feels good. :) You should try it.

So here's a challenge for you: make a card and send it (yes, use snail mail) to someone you care about, love, or are just thinking about. Your card doesn't have to be complicated. Simple goes a long way.

Happy Stampin',
~Cita

Sunday, March 03, 2013

Swaps Gone Wrong

During a monthly Ladybug Swap last year during Sale-a-Bration, I made a bad calculation when trying to figure out how much Designer Series Paper and ribbon I needed to complete my swaps. The result was three different swaps that had to go out. I know that's not how swaps are supposed to work, but in the interest of time and sanity, that was they way it had to be.

This was the original swap I designed. I loved the fan-like background of the DSP. Also, notice the nice Lucky Limeade ribbon.
And then I ran out of that fan-like DSP, so I switched to a striped DSP from the same Elementary Elegance collection. I also ran out of the ribbon, so I switched to a Calypso Coral ribbon.


And THEN, I ran out of the striped DSP. So I switched to this Pool Party-dominate DSP. At this point, I had to switch the background cardstock to Calypso Coral. I think it worked out well.

I learned a lot during this round of swaps. First, learn how to do math. :-)

Do you have any funny or frustrating swap stories? Share with me!

Happy Stampin"
~Cita

Saturday, February 23, 2013

Bloomin Betsy


Have you ever bought a stamp set with every intention to use it, only to find yourself putting it away and forgetting about it before you ever use it? Well, I did just that with the Betsy's Blossoms stamp set. I was so excited to get it when the new catalog came out in June, and then I just forgot about it. That was until this past fall when I led a small group at my church where we made cards and scrapbooked each week. I showed this this simple, but cute card using the Betsy Blossom's stamp set. I then remembered how much I like this set.

Stampin Cita Tips:
  • Color scheme: Raspberry Ripple, Whisper White, and Gumball Green 
  • Stamp Sets: Fabulous Phrases, Betsy's Blossoms, Betsy's Blooms Stampin Wheel 
  • Accessories: 
  • To get the background, use the Betsy's Blooms Stampin Wheel to stamp the flower background on a piece of Whisper White cardstock. 
  • Give the bird dimension, by cutting it out using your paper snips and then adhering it over the Gumball Green branch with a Stampin' Up! dimensional. Add a pearl for its eye to give it an extra embellishment. 
  • Stamp your sentiment on Whisper White cardstock using any of the variety of words in the Fabulous Phrases stamp set. Position the word in the bottom of the curly label and punch out the word. 
I hope you get to use all your stamp sets! And check out Betsy's Blossoms!

Happy Stampin'
~Cita 

Friday, February 08, 2013

Ladybug Ink Blog Hop: Valentine Style


I'm going to be honest right away - I am not a fan of Valentine's Day. :-) I'll spare you the details as to why I feel this way, but needless to say, I still participate. And I'm participating in this month's Valentine-themed blog hop. Woo-hoo. I have to admit it. I enjoyed making my cute little owl card. Thank you to Linda Throgmorton for inspiring my card, specifically giving me the idea to bust out my Owl Punch and make cute little owls in love.


I named the two owls. The owl on the left is named Carmelita, and the owl on the right is named Steve. :)

You can make these owls by using the Owl punch. Use a 2-way glue pen to glue all the little pieces together. I used the flower vine stamp from the Tiny Tags stamp set to make the little flower border on the Whisper White cardstock. I stamped the "Love You" stamp from the Seasonal Sayings stamp set in Versamark and then embossed it with Whisper White embossing powder. I just found out that this stamp set carried over from the Holiday Mini Catalog. I was excited. Finally, I tied a bow  using a basic gray tafetta ribbon.

The great thing about making a Valentine's card is I now have a card for my hubby. Now to make a birthday card for my daughter, who is my ultimate Valentine's day present. :)

Hope on over to Cassie's blog! Thanks for visiting.

Happy Stampin'
~Cita

Ladybug Roll Call!
Nichole Gonzales Jaramillo http://nicholesu.blogspot.com/
You're Here: Carmelita Wasson http://carmenacita.blogspot.com/
Cassie Rogers http://lucyslovelies.blogspot.com/
Michelle Carrion www.ilovecrafttime.blogspot.com

Friday, February 01, 2013

Distress and Art


I belong to a team of Stampin' Up! demonstrators called Ladybug Ink. Each month, we meet and exchange ideas as well as participate in a card swap with a different theme. I love these swaps because they help me explore ideas, techniques, themes, and techniques I don't think I would on my own. A few months ago, the theme of the Ladybug swap was ink techniques. In my search for a unique ink technique (say that three times fast), I came across Sherry Cheever's Wrinkle Free Distress tutorial on the Splitcoast Stampers website. I quickly embraced the technique and had a night of fun playing with ink and my brayer.

Now, our swaps have a few rules - three layers, current Stampin Up! product, and at least one embellishment. So I needed an embellishment. I punched out three "leaves" using the scallop punch from the Itty Bitty Shapes punch pack and then layering them under a Dahlia. And the beautiful sentiment is from the Trust God stamp set. 

If you would like to join my team of Ladybug stampers and participate in these awesome and challenging swaps, contact me. Being a Stampin' Up demonstrator is such a fun and rewarding experience. You should try it!

Happy Stampin' 
~Cita

Friday, January 25, 2013

Flowers on the Fly


A while ago, I helped out at a women's retreat for church. Actually, I co-led it, which is why I didn't have a card prepared for the craft time at the end of the retreat. (bad Carmelita!). So, I made one up on the fly. I grabbed a few supplies as I was walking out the door, and ended up with the Raining Flowers stamp set, random colors of paper, like Perfect Plum and Wisteria Wonder, and the scallop border punch. Hey, it's a SIP (stamps, ink, and paper) card! (I wonder why I didn't grab any embellishments).

This just shows how you can make a nice card with minimal supplies and little time. Just take a little SIP!

Happy Stampin'
~Cita

Friday, January 18, 2013

Ladybug Ink Blog Hop: Secret Garden

Hello, and welcome to the first Ladybug Blog hop of 2013! I hope you have recovered from the holiday season and are taking seize of 2013. I can't believe we are already more than half way through January. 2013 is shaping up to be a whirlwind of a year.

Anyways, my project this month focuses on the Secret Garden suite in the new Spring Catalog. I generally stay away from flower sets because I have so many of them, but I couldn't say "no" to the Secret Garden set because it comes with coordinating framelits. Excited is an understatement as to how I felt.

And then I got this crazy idea as I was walking through the dollar store and spotted a magnet picture holder. The magnets were not strong magnets, but thin enough that I felt comfortable sending through my Big Shot with the framelits. Plus, I love making magnets. It's becoming as addicting as making cards. Disclaimer: Framelits are not recommended to be used with anything other than paper/cardstock. You can damage your framelits or get undesired results when using framelits to cut other materials. Consider yourself warned. Now on with the project!


These are more of decoration magnets due to the strength of the magnets that I used. But they are so pretty!

The size of my magnet sheet was 4"x6". I was able to cut all five flower shapes from the Secret Garden Framelits.I put these to the side for awhile and turned to stamping. I should also mention that no framelits were harmed in any process of this project.

I stamped all five flowers from the Secret Garden stamp set on Raspberry Ripple cardstock. I then embossed each flower. For lined flowers, I used silver embossing powder. For "colored" flowers I stamped the flower using the Foam pad Raspberry Ripple pad and then embossed it with clear embossing powder. I love how you can use the new pads for embossing. They work great! Next it was time to use the framelits again to cut out each flower.
My craft area is a mess!
I love how you can run all the framelits through the Big Shot at once. It helps save time.


Look at all my Secret Garden flowers. I didn't make these all into magnets. Actually, I layered many of my flowers on top of each other to give them dimension. Also, using a bone folder to curl the edges of the flowers upward gives them dimension.

Thanks for stopping by. Head on over to Cassie's blog, who I believe has a cute project for you as well.

Happy Stampin'
~Cita


Ladybug Roll Call!
Nichole Gonzales Jaramillo http://nicholesu.blogspot.com/
You're Here: Carmelita Wasson http://carmenacita.blogspot.com/
Cassie Rogers http://lucyslovelies.blogspot.com/
Michelle Carrion www.ilovecrafttime.blogspot.com

Monday, January 14, 2013

Dude, You're Welcome!


Check out this amazing new kit for men designed by men. It's a simple kit that encourages men to create hand-made gifts that are quick, simple, and easy. Of course, us women will most likely get our hands onto this thing. Check it out though.

The kit includes everything a guy needs to make a handmade card:
  • Four wood-mount stamps (double-mounted) with the perfect sentiment for every occasion
  • Twelve 4" x 6" postcards in four different (manly) colors
  • Twelve gray envelopes
  • A Basic Gray Classic Stampin’ Pad
  • An instructional guide (for the most novice stamper!)
Check out the kit in action.


Ha! Real Men Build Cards! I love it. I think I'm going to go post this video on my husband's Facebook page. :)

Head on over to my store, or send your closest man over to my store, to purchase this manly stamp kit.

Happy Stampin!
~Cita

Saturday, January 12, 2013

Book Buddies: An Update

So remember how I entered my Book Buddies scrapbooking layout into the current My Digital Studio challenge over on MYdigitalstudio.net? Well, I didn't win, but I got an honorable mention, which made my day. Check out the blog entry, the challenge winner, and the new challenge over on the MyDigitalStudio blog.

Happy Stampin',
~Cita

Friday, January 11, 2013

Book Buddies!


First of all, I'm totally biased, but I think my daughter is absolutely adorable. :) What do you think?

Ok, back to business.

This week, I entered my first My Digital Studio challenge over on MyDigitalStudio.Net, the website for all things My Digital Studio. This site has amazing samples, video tutorials, forums, and challenges all related to helping you make the most out of MDS.

This week's challenge called for an entry using any download released in December 2012. I remembered seeing the Book Buddies download and thinking that it would be a great set to use for all my pictures of the Booger reading books, in particular this set of pics of her and the daddy reading "Go Train Go!", which is one of her favorite books. The download is advertised as book marks, but comes with 8 embellishments and 3 stamps that can be used in more ways than for book marks, as I did in this page. 

What's more, I used two "new" features that allow you to make the text wavy, as I did with the white text toward the bottom of the page. Holly Linford has a great video tutorial to show you how to do this.


Another great feature of MDS2 is the ability to crop embellishments or stamps. See those stack of books? Here's the original embellishment.


I cropped the fox out of view and then copied and pasted the result to get a pile of books. You can't see it very well, but if you look closely, I was also able to recolor several of the books. MDS2 is amazing. I love playing with it.

Anyways, check out my entry on the MDS website and like it. I'm hoping that there will be many more challenges I can participate in this year. You don't have to be a demonstrator to participate. If you don't have MDS, check out the 30-day free trial. You won't regret it.

Happy Stampin' and Digital Designing!

~Cita 

Friday, January 04, 2013

Breaking the Rules


One of my favorite tools these days are the framelits. I'm getting a little greedy with framelits. I think I am even starting to prefer them over punches. I love how you can precisely position the framelits over stamped images, and of course, they are super easy to use along with the Big Shot. Stampin' Up! recommends that you use the framelits only with one sheet of paper/cardstock; however, I broke the rules with this project and used my framelits with a magnetic sheet. Disclaimer: Framelits are not recommended to be used with anything other than paper/cardstock. You can damage your framelits or get undesired results when using framelits to cut other materials. 

With that being said - I did not damage my framelits (although I knew the risk), but it was quite a task cutting the magnet sheets. I had to run the framelits with the magnet sheet twice through the Big Shot to get a full cut, and the cut wasn't as clean as if I was cutting paper. Needless to say, I got my shaped magnet (I used the Labels Collection Framelits). What's great is then I used the framelits to cut the perfect sized/shaped paper to decorate my magnet. 

I made quite a few of these magnets, but gave away several. I love using the Trust God stamp set to stamp inspirational sayings and verses on the magnets.  Here are two of my magnets on my already cluttered whiteboard. I since have given one of these magnets to a coworker and the other one is holding up some paper at my work office.

Have you done any nonconventional projects with your framelits? I would love to hear about them.

Happy Stampin'!
~Cita

Thursday, January 03, 2013

Hello New Spring 2013 Catalog

What a great way to start a new year - with a new Stampin' Up! Catalog! It's here, with awesome bundles, more framelits, and the cutest stamp sets around. Take a look and then head over to my website to make you Spring Catalog purchases!

Click the catalog to view the awesome!

Enjoy the new catalog!

Happy Stampin'
~Cita

Tuesday, January 01, 2013

Happy New Years!


Happy 2013!

I hope this year is brings you blessings, adventure, and lots of time to stamp and papercraft! :)

To celebrate the new year, Stampin' Up! if offering this cute January desktop calendar MDS download for FREE. Head over to my SU! website to download it!

Happy New Year!

~Cita

Friday, December 28, 2012

Blooming with Thanks


Need some quick thank you cards for all the amazing gifts you received over the Christmas season? Here is a super simple, quick and easy design for you. One ink, two pieces of cards stock, and two stamps sets (Itty Bitty Banners and Betsy's Blossoms). You can crank these babies out in no time and send a special thank you.

Add a little more to the card by finishing off the blossom with a small, simple pearl. 

If you are still in need of simple gifts (as I am because I skipped Christmas and am now scrambling to send out cards and send out presents), package a few thank you cards in a cellophane bag and give as a gift. 


Since I am talking about thanks, I would like to thank you for reading my blog. I am not a consistent blogger, which technically makes me a bad blogger, but I do enjoy sitting down to write and share about what I love to do most - stamp. Thank you for spending a few moments on my little island of the blogosphere. 

Happy Stampin'!

~Cita

Thursday, December 27, 2012

Show and Tell: He is Risen


I know that we have just celebrated the birth of our savior, Jesus Christ, but I think it's a great time to also reflect on his ultimate sacrifice. I guess that's why this card was hidden among my Christmas cards. I made this for a workshop during the spring and never posted it. I love this stamp (which is now retired) and loved this Easter card.

As we approach 2013, I pray that the Lord blesses you this year in ways you never imagined.

Praise be to the God and Father of our Lord Jesus Christ! In his great mercy he has given us new birth into a living hope through the resurrection of Jesus Christ from the dead.
~1 Peter 1:3

Happy Stampin'
~Cita

Friday, December 21, 2012

Ornament Frenzy

I can not get enough of the Be of Good Cheer DSP. I love the color scheme (Cherry Cobbler, Gumball Green, and Very Vanilla) as well as the simplicity of the patterns. This paper is great for all sorts of Christmas projects. I made the above card for a workshop in October. Since I like to think of myself as a creative coach, not a dictator, I encourage my customers to stray from my design if they would like to. Below are the cute variations on my card. Didn't they do great? I really enjoyed seeing the different ideas all from the same supplies and concept.


I hope this holiday season is treating you nicely and that all your preparations are "on schedule." :)

Happy Stampin'

~Cita

Friday, December 14, 2012

Ladybug Ink Blog Hop: Cards in a Box

Hello! Welcome to my blog and the Ladybug Blog Hop. I hope you have been enjoying the hop, and if you are just beginning your hopping, make sure to check out all the other talented ladies. 

 I love the Christmas season and all the fun projects that go along with it! I wanted to share this box card set that I made. I got the idea from the one and only Mary Fish, and I have used this idea for so many card sets. Although my box and card are Christmas-themed, I have used this idea for birthday card sets, thank you cards sets, etc. I have given them away as door prizes, presents, and silent auction items. Take this idea and make someone you love, or maybe even just like, a set of handmade cards and a matching box for their use.

And while I have your attention, check out what I thought was a good idea that ended up....melting?

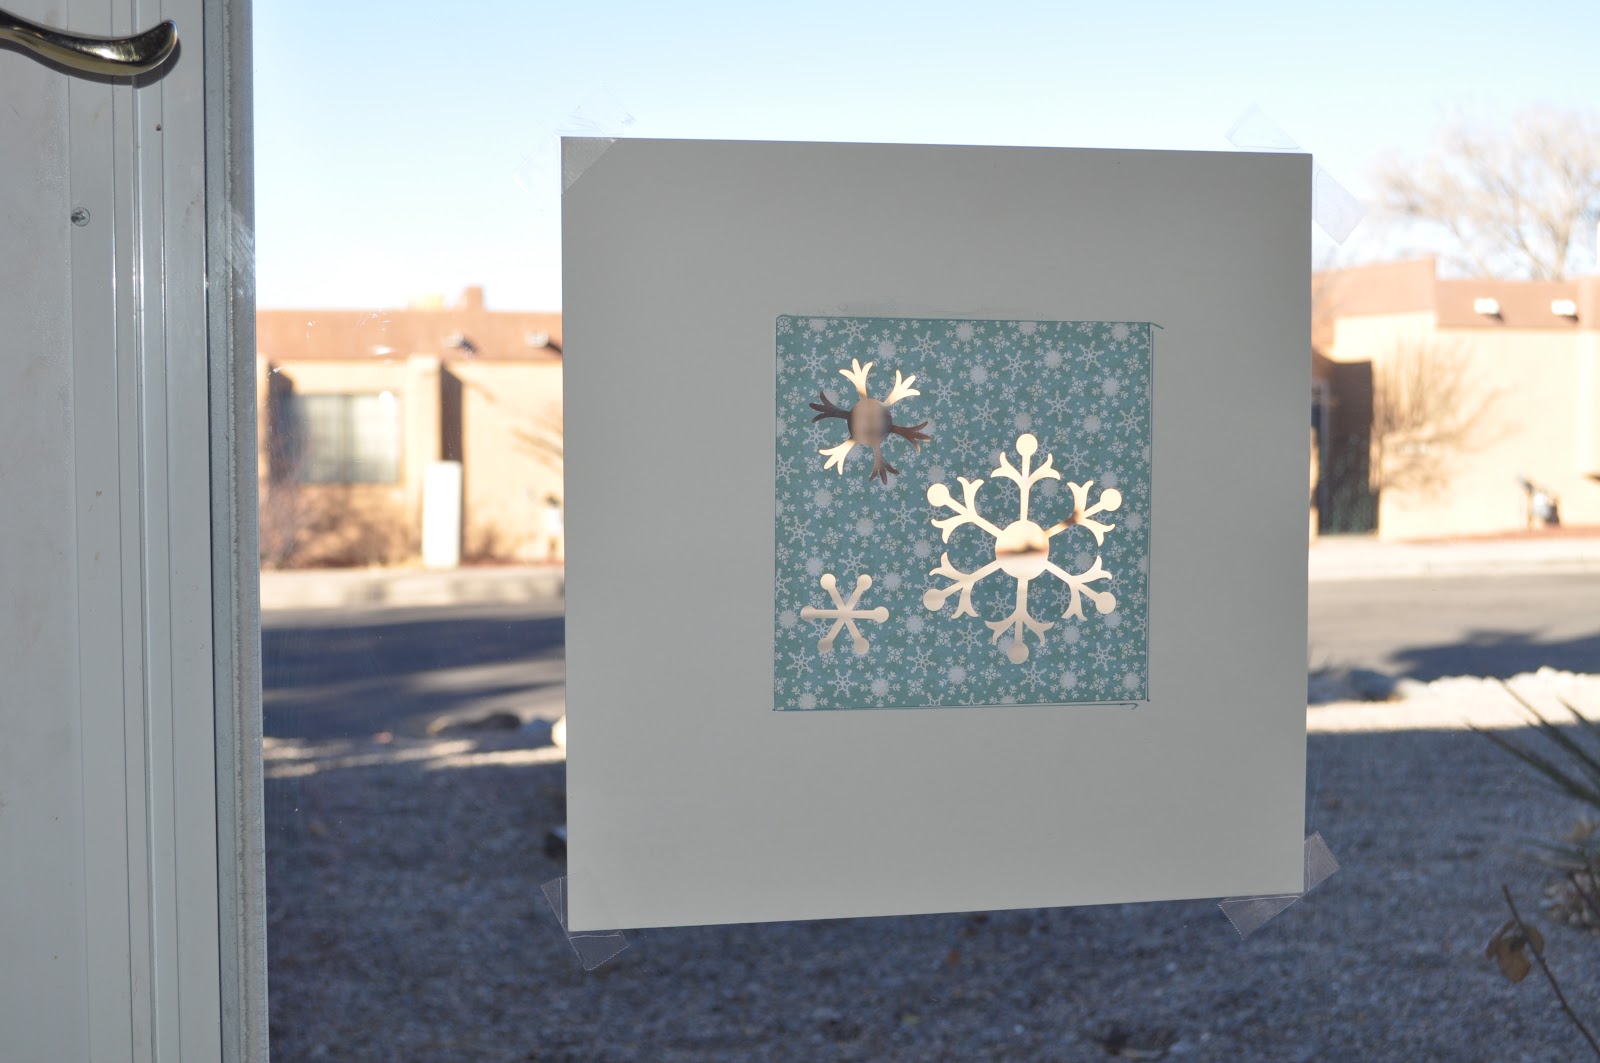
So I wanted to make perfect snowflakes on my window this year using that fake snow in a can stuff. I was cutting snowflakes out with the Snow Flurry Bigz die and thought that the paper would make a perfect snowflake stencil. In theory it was a great idea, but for some reason, the snowflakes kind of melted over the day, and now there's just a big blob of snow crap on my window. Maybe it'll work better for you.

There's my ultimate snowflake stencil. I cut out a square in the middle of bigger piece of cardstock (I used the random piece that comes with the Stampin' Up! DSP.
I had a two year old helping me. I need both my hands (and maybe two more). So, I taped my stencil to the door.

Then I sprayed the stencil with the snow-in-a-can.

Wa-la. Almost perfect snowflakes? You can see the little one starting to melt.

 Thanks for visiting my blog. Head on over to Cassie's blog to check out her awesome project.

Happy Stampin',
Carmelita


Ruth Norton http://ruthsstampingcorner.blogspot.com/
Amber Wilson http://amberladybugink.blogspot.com/
Nichole Gonzales Jaramillo http://nicholesu.blogspot.com/
Kay Jantz http://ktmyldyandlife.blogspot.com
Liz Kay www.kraftasticmrskay.blogspot.com
You're Here! Carmelita Wasson http://carmenacita.blogspot.com/
Cassie Rogers http://lucyslovelies.blogspot.com/


Friday, December 07, 2012

Wise Variations on a Card

When starting out with stamping, my demonstrator mentioned that all you need to do is take a SIP. In other words, all you need to make a card is Stamps, Ink, and Paper. She is absolutely right, but after I got a hold of all the amazing tools and learned all the cool techniques, it was kind of hard to go back to the SIP card. Recently, I focused on a SIP card during a workshop to shop how you can create a beautiful card with minimal supplies.


Here is my SIP card using just cardstock, ink, and the Come to Bethlehem stamp set. I picked this stamp set because it has a beautiful design as well as a nice greeting that are perfect for a nice, simple Christmas card.
Of course, all cards can be up-dazzled with a few embellishments. I took the same card and added some Always Artichoke Seam Binding Ribbon and a Rhinestone. Instead of stamping the greeting directly on the card, I stamped it on a piece of Very Vanilla and punched it out with the Decorative Label punch.

Happy Stampin'
~Cita

Snowed In

It's like we were destined to not go to school today. I woke up to a beautiful 6 inches of snow in my yard. We are in the lower elevatio...