I can not get enough of the Be of Good Cheer DSP. I love the color scheme (Cherry Cobbler, Gumball Green, and Very Vanilla) as well as the simplicity of the patterns. This paper is great for all sorts of Christmas projects. I made the above card for a workshop in October. Since I like to think of myself as a creative coach, not a dictator, I encourage my customers to stray from my design if they would like to. Below are the cute variations on my card. Didn't they do great? I really enjoyed seeing the different ideas all from the same supplies and concept.
I hope this holiday season is treating you nicely and that all your preparations are "on schedule." :)
Happy Stampin'
~Cita
Carmelita Wasson - mom, professional volunteer, Girls Scout Leader, First Lego League Coach, queen of procrastination
Friday, December 21, 2012
Friday, December 14, 2012
Ladybug Ink Blog Hop: Cards in a Box
Hello! Welcome to my blog and the Ladybug Blog Hop. I hope you have been enjoying the hop, and if you are just beginning your hopping, make sure to check out all the other talented ladies.
I love the Christmas season and all the fun projects that go along with it! I wanted to share this box card set that I made. I got the idea from the one and only Mary Fish, and I have used this idea for so many card sets. Although my box and card are Christmas-themed, I have used this idea for birthday card sets, thank you cards sets, etc. I have given them away as door prizes, presents, and silent auction items. Take this idea and make someone you love, or maybe even just like, a set of handmade cards and a matching box for their use.
And while I have your attention, check out what I thought was a good idea that ended up....melting?
So I wanted to make perfect snowflakes on my window this year using that fake snow in a can stuff. I was cutting snowflakes out with the Snow Flurry Bigz die and thought that the paper would make a perfect snowflake stencil. In theory it was a great idea, but for some reason, the snowflakes kind of melted over the day, and now there's just a big blob of snow crap on my window. Maybe it'll work better for you.
Thanks for visiting my blog. Head on over to Cassie's blog to check out her awesome project.
Happy Stampin',
Carmelita
Ruth Norton http://ruthsstampingcorner. blogspot.com/
Amber Wilson http://amberladybugink. blogspot.com/
Nichole Gonzales Jaramillo http://nicholesu.blogspot.com/
Kay Jantz http://ktmyldyandlife. blogspot.com
Liz Kay www.kraftasticmrskay.blogspot. com
You're Here! Carmelita Wasson http://carmenacita.blogspot. com/
Cassie Rogers http://lucyslovelies.blogspot. com/
I love the Christmas season and all the fun projects that go along with it! I wanted to share this box card set that I made. I got the idea from the one and only Mary Fish, and I have used this idea for so many card sets. Although my box and card are Christmas-themed, I have used this idea for birthday card sets, thank you cards sets, etc. I have given them away as door prizes, presents, and silent auction items. Take this idea and make someone you love, or maybe even just like, a set of handmade cards and a matching box for their use. And while I have your attention, check out what I thought was a good idea that ended up....melting?
So I wanted to make perfect snowflakes on my window this year using that fake snow in a can stuff. I was cutting snowflakes out with the Snow Flurry Bigz die and thought that the paper would make a perfect snowflake stencil. In theory it was a great idea, but for some reason, the snowflakes kind of melted over the day, and now there's just a big blob of snow crap on my window. Maybe it'll work better for you.
| There's my ultimate snowflake stencil. I cut out a square in the middle of bigger piece of cardstock (I used the random piece that comes with the Stampin' Up! DSP. |
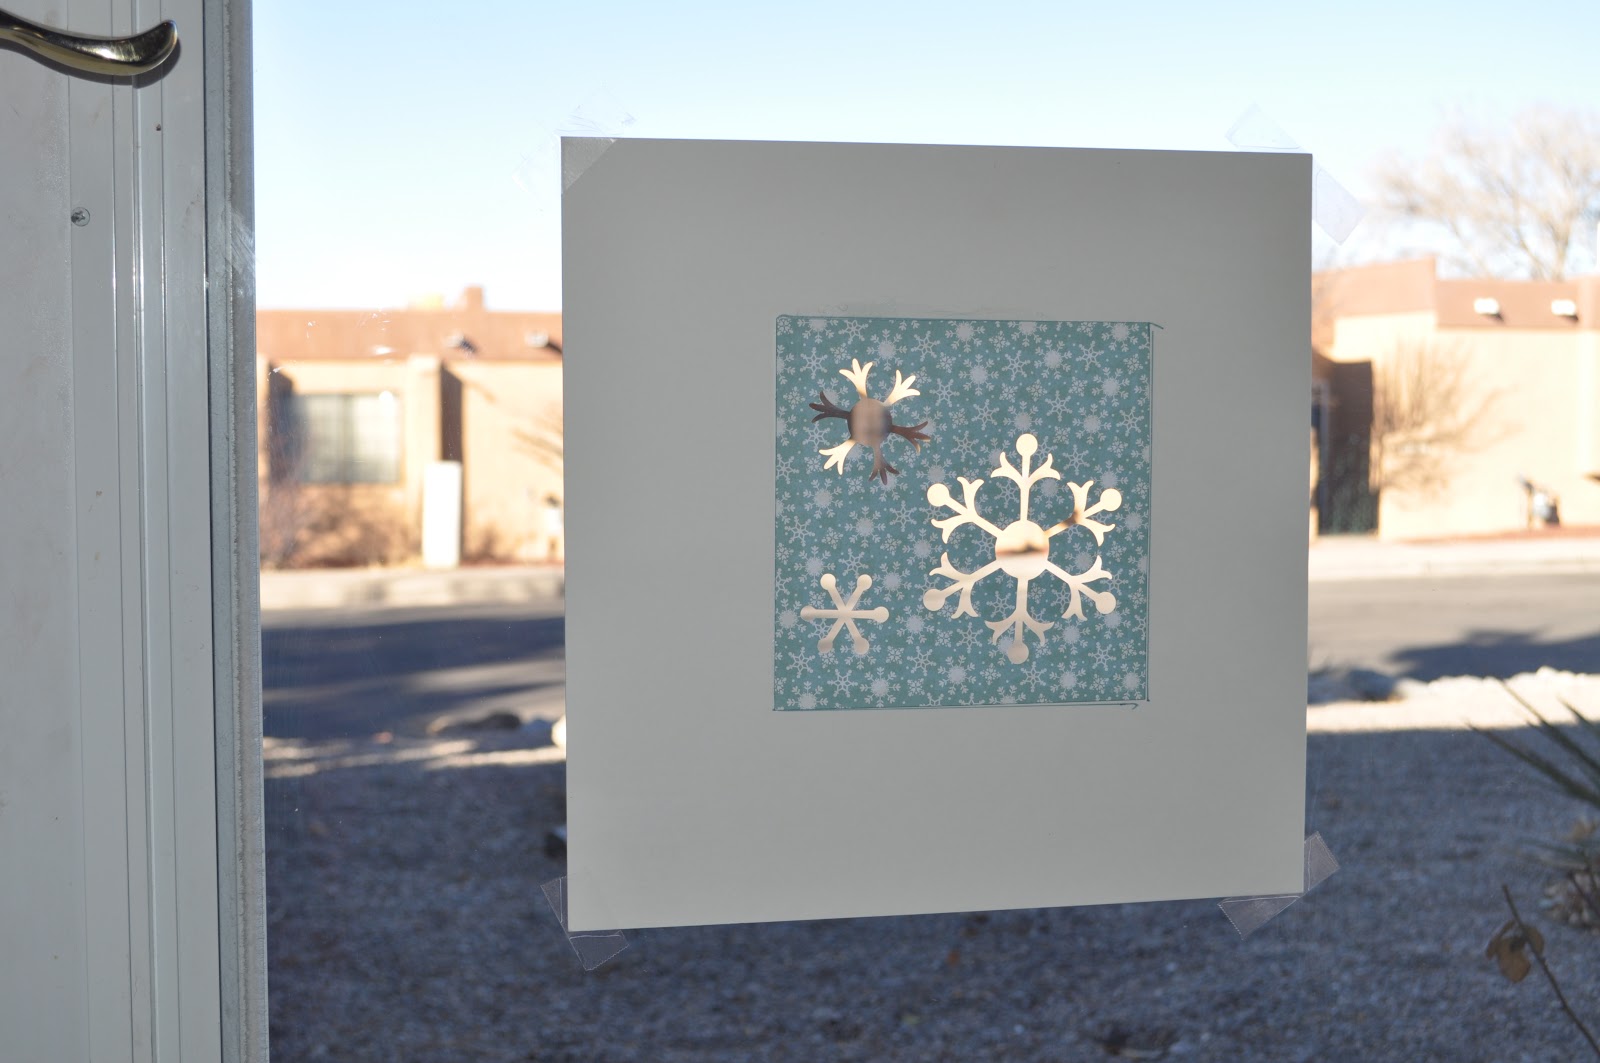
| I had a two year old helping me. I need both my hands (and maybe two more). So, I taped my stencil to the door. |
| Then I sprayed the stencil with the snow-in-a-can. |
| Wa-la. Almost perfect snowflakes? You can see the little one starting to melt. |
Thanks for visiting my blog. Head on over to Cassie's blog to check out her awesome project.
Happy Stampin',
Carmelita
Ruth Norton http://ruthsstampingcorner.
Amber Wilson http://amberladybugink.
Nichole Gonzales Jaramillo http://nicholesu.blogspot.com/
Kay Jantz http://ktmyldyandlife.
Liz Kay www.kraftasticmrskay.blogspot.
You're Here! Carmelita Wasson http://carmenacita.blogspot.
Cassie Rogers http://lucyslovelies.blogspot.
Friday, December 07, 2012
Wise Variations on a Card
When starting out with stamping, my demonstrator mentioned that all you need to do is take a SIP. In other words, all you need to make a card is Stamps, Ink, and Paper. She is absolutely right, but after I got a hold of all the amazing tools and learned all the cool techniques, it was kind of hard to go back to the SIP card. Recently, I focused on a SIP card during a workshop to shop how you can create a beautiful card with minimal supplies.
Here is my SIP card using just cardstock, ink, and the Come to Bethlehem stamp set. I picked this stamp set because it has a beautiful design as well as a nice greeting that are perfect for a nice, simple Christmas card.
Of course, all cards can be up-dazzled with a few embellishments. I took the same card and added some Always Artichoke Seam Binding Ribbon and a Rhinestone. Instead of stamping the greeting directly on the card, I stamped it on a piece of Very Vanilla and punched it out with the Decorative Label punch.
Happy Stampin'
~Cita
Here is my SIP card using just cardstock, ink, and the Come to Bethlehem stamp set. I picked this stamp set because it has a beautiful design as well as a nice greeting that are perfect for a nice, simple Christmas card.
Of course, all cards can be up-dazzled with a few embellishments. I took the same card and added some Always Artichoke Seam Binding Ribbon and a Rhinestone. Instead of stamping the greeting directly on the card, I stamped it on a piece of Very Vanilla and punched it out with the Decorative Label punch.
Happy Stampin'
~Cita
Thursday, November 08, 2012
Ladybug Ink Blog Hop: Quick and Easy Christmas Cards
It's time once again for the monthly Ladybug Ink Blog Hop! This month we are focusing on the holidays. I love Thanksgiving, but it's all about Christmas for me. :) So this month, I focused on Christmas cards, the quick and easy variety. I love making Christmas cards, but with a 2 year old to chase, I just don't have time make elaborate Christmas cards. That's why I loved using the Snow Festival Designer Printed Tags and the Note Cards to make these quick and easy Christmas cards. The printed tags are a great starting point for simple, yet heartfelt, cards. Stamp, adhere, add an embellishment, and wa-la, a beautiful, handmade Christmas card.
The Snow Festival Designer Printed Tags (128152, $3.95) come 25 to a pack, with 5 each of 5 designs. It's a great deal, and you can use the tags for a variety of things. Obviously, I used my pack to make cards, but these would also make great labels, great to/from tags, place tags, and stocking stuffers. Below are five cards I made using the tags with a few additional supplies.
Thanks for visiting my blog. Head on over to Cassie's blog to see what surprise she has waiting for you!
blogspot.com/
The Snow Festival Designer Printed Tags (128152, $3.95) come 25 to a pack, with 5 each of 5 designs. It's a great deal, and you can use the tags for a variety of things. Obviously, I used my pack to make cards, but these would also make great labels, great to/from tags, place tags, and stocking stuffers. Below are five cards I made using the tags with a few additional supplies.
![]() ![]() |
| Cherry Cobbler is the best Christmas Red. Garden Green Cardstock, Garden Green Ink, Cherry Cobbler Cardstock, Petals-A-Plenty Textured Impressions Embossing Folder Die, More Merry Messages Stamp Set |
![]() ![]() | |
| Who would have thought that Primrose Petals would be a good Christmas color too? 1-1/4" Scallop Circle Punch, 1/2" Scallop Dots Ribbon Cherry Cobbler, Mixed Medley Stamp Set. |
Thanks for visiting my blog. Head on over to Cassie's blog to see what surprise she has waiting for you!
Ladybug Ink Blog Hop
Kim Madrid http://kimsstampsanctuary. blogspot.com/
Nichole Gonzales Jaramillo http://nicholesu.blogspot.com/
Kay Jantz http://ktmyldyandlife. blogspot.com
Cassie Rogers http://lucyslovelies.blogspot. com/
Ruth Norton http://ruthsstampingcorner.Friday, October 12, 2012
Ladybug Ink Blog Hop: Halloween Style
Welcome to the Ladybug Ink Blog Hop! This month's theme is...wait for it....Halloween!
Personally, I'm not a big fan of Halloween. It was great when I was little. What little kid doesn't like candy, right? Nowadays, it's not as appealing; however since having my little Booger Bug (aka my daughter), some of the appeal is coming back. And then there's the cute Googly Ghouls stamp set and coordinating Ghoulish Googlies Designer Kit that makes prepping for Halloween fun. I'm planning on using this bundle to make treats for the Booger's class and my coworkers.
The Ghoulish Googlies Bundle comes with everything you need to make the bag on the right. I used the Border Banter stamp set and some designer series paper to make the card on the left.
Using the designer kit makes this card super easy. Color scheme: Basic Black, Whisper White, Lucky Limeade, and Pumpkin Pie.
The Ghoulish Googlies kit comes with everything you need to make this adorable bag (except the Chevron embossing folder). To emboss the bag, just put it in the Chevron embossing folder and run it through the Big Shot. It adds a great touch. Fill the bags with candy or other goodies.
Meet the Googlie Cottonball. Put some Googlies on a cottonball and you have a cute little ghost-looking creature.
The Booger really liked Googlie Cottonball. It became her friend for the day.
Thanks for visiting my blog. Head on over the Cassie's blog and check out her Halloween creation.
~Cita
Ladybug Ink Blog Hop
Kim Madrid http://kimsstampsanctuary.
Nichole Gonzales Jaramillo http://nicholesu.blogspot.com/
Kay Jantz http://ktmyldyandlife.
Liz Kay www.kraftasticmrskay.blogspot.
YOU'RE HERE!! Carmelita Wasson http://carmenacita.blogspot.
Cassie Rogers http://lucyslovelies.blogspot.
Ruth Norton http://ruthsstampingcorner.
Monday, October 08, 2012
Stampin' Claus has come to Town!
Here comes Stampin' Claus! Here comes Stampin' Claus! Right down Stampin' Lane!!
In October!!!
During the month of October, get a FREE Festive Paper-Piercing Pack when you purchase the Ornament Keepsakes Set and Candlelight Christmas Specialty Designer Series Paper.
You can pick from the following options to get this awesome pack.
Item
|
Description |
Retail Value
|
Special Price
|
|
132260
|
Christmas Gift Pack (wood-mount) Includes Ornament Keepsakes Set (wood-mount), Candlelight Christmas Specialty Designer Series Paper, Festive Paper-Piercing Pack |
$55.85
|
$47.90
|
| 132261 | Christmas Gift Pack (clear-mount) Includes Ornament Keepsakes Set (clear-mount), Candlelight Christmas Specialty Designer Series Paper, Festive Paper-Piercing Pack |
$44.85
|
$38.90
|
| 132262 | Christmas Gift Pack (wood-mount bundle) Includes Ornament Keepsakes Bundle (wood-mount), Candlelight Christmas Specialty Designer Series Paper, and Festive Paper-Piercing Pack |
$70.85
|
$62.90
|
| 132263 | Christmas Gift Pack (clear-mount bundle) Includes Ornament Keepsakes Bundle (clear-mount), Candlelight Christmas Specialty Designer Series Paper, and Festive Paper-Piercing Pack |
$63.85
|
$55.90
|
Head on over to my website to make your purchase and get the free Paper-Piercing Pack!
Happy Stampin'
~Cita
Thursday, October 04, 2012
Simple Thanks
Last month, my wonderful downline, Kim, and I (along with some other Ladybug Stampers) attended the Stampin' Up! regional in Denver, Colorado. We had a blast, and Kim drove us all the way there, and even drove me to the airport after the regional. If you have ever flown into or out of Denver, you will understand that the airport is not close to downtown. :) Kim is awesome. Anyways, she sent this to me after regionals. She was inspired to use a Simply Scrappin' kit to make a card. They are great to make quick and easy cards. And I loved what Kim did.
If you would like to join my team of stampers, email me, and I can get you hooked up. The new starter kit is now only $99 and it's fully customizable and comes with over $125 in product. It's a great deal. And then maybe next time you can join us at a Stampin' Up! regional!
Happy Stampin'
~Cita
Tuesday, September 18, 2012
Lovely Swaps
I'm going through all my pictures of cards that I have taken this past year (and maybe even further back) and by golly, I'm going to post them all! Be prepared if you are a frequent reader of this blog. Do I even have regular readers? Are you out there? If so leave me a comment.
Anyways, these cards are from a Ladybug Ink swap from sometime within in the last year. I'm thinking they may have been from November of 2011. Yikes!
~Cita
Sunday, September 16, 2012
Remembering Cupcakes
Once upon a time, I met a Stampin' Up! demonstrator who invited me to her stamp club. After much hesitation, I excitedly joined the club. One of the first projects I ever completed in this stamp club used the now-retired Crazy for Cupcakes stamp set. Guess what I did? I bought that stamp set and never used it again. That's a flat out lie, but it sounded funny in my head, because how many of us have ever fallen in love with a stamp set, bought it, and then let it sit on our craft desk collecting dust for years? Anyways, even though the Crazy for Cupcakes is long gone, I wanted to share this beautiful card with you just in case you still have the Crazy for Cupcakes stamp set sitting somewhere collecting dust.
Stampin Cita' Tips:
- Color scheme: Pink Pirouette, Chocolate Chip, Whisper White
- Stamp Sets: Crazy for Cupcakes (retired), Fresh Vintage (Sale-a-Bration 2012)
- When using framelits, stamp the image first and then place the framelit on top to cut it out. This will allow you to get the perfect position. If your framelit moves, use a sticky note to temporarily attach it to the paper.
- To get the oval frame for the Labels Framelits, just cut out two ovals using the small oval punch and adhere them to the back of Labels framelit with the cupcakes.
- Use Dazzling Diamonds to color the cupcakes' frosting. I think glitter makes these cupcakes look scrumptious. mmm cupcakes sound good right about now.
Hope you enjoy this blast from the not so distant past.
~Cita
Friday, September 14, 2012
LadyBug Ink Blog Hop: MDS Style
It's Hop time! (I suddenly want to break out in song to "Let's go to the Hop!"). This month, we are focusing on showcasing My Digital Studios (MDS) projects. If you are hopping from Kay's blog, welcome! If you are just joining the adventure, thanks for starting here. You're hopping adventure will take you to six other Ladybug stampers' blogs, where you can marvel at their creativity!
To me, MDS is such a versatile piece of software. I chose to showcase a quick and simple project that Holly Linford showed us at the Stampin' Up! regional in Denver, CO last weekend. This is a simple sour cream treat holder made with regular printer paper printed from my simple at-home printer. I used MDS to create the Halloween looking paper from non-Halloween DSP.
I started with a 11 x 8.5 Landscape canvas in MDS. This is the perfect size because you can prep for four of these treat holders with only one piece of paper. My finished MDS project looked like this.
And then I printed that cutie out. My printer didn't even grumble. Notice the white border around my printer. Most regular printers don't have a bleed option, so you're most likely going to have that border around your printout. Just cut it off.
Next, cut out each rectangle and adhere the sides together so you get a toilet-paper-roll-looking piece of paper. I would recommend using sticky strip to do this (I didn't while prepping for this post because I'm out of sticky strip!
Place adhesive at the bottom of the tubes and pinch it shut. See the sour cream shape starting to form?
Now time to fill with treats! I recommend chocolate!
Finally, adhere the top of the treat and pinch it in the opposite direction of the bottom. And that's it! Four sour cream treat holders from one piece of paper.
Thanks for reading! Now hop on over to Cassie's blog to check out what she has.
~Cita
To me, MDS is such a versatile piece of software. I chose to showcase a quick and simple project that Holly Linford showed us at the Stampin' Up! regional in Denver, CO last weekend. This is a simple sour cream treat holder made with regular printer paper printed from my simple at-home printer. I used MDS to create the Halloween looking paper from non-Halloween DSP.
I started with a 11 x 8.5 Landscape canvas in MDS. This is the perfect size because you can prep for four of these treat holders with only one piece of paper. My finished MDS project looked like this.
And then I printed that cutie out. My printer didn't even grumble. Notice the white border around my printer. Most regular printers don't have a bleed option, so you're most likely going to have that border around your printout. Just cut it off.
Next, cut out each rectangle and adhere the sides together so you get a toilet-paper-roll-looking piece of paper. I would recommend using sticky strip to do this (I didn't while prepping for this post because
Place adhesive at the bottom of the tubes and pinch it shut. See the sour cream shape starting to form?
Now time to fill with treats! I recommend chocolate!
Finally, adhere the top of the treat and pinch it in the opposite direction of the bottom. And that's it! Four sour cream treat holders from one piece of paper.
Thanks for reading! Now hop on over to Cassie's blog to check out what she has.
~Cita
September Ladybug Ink Hop
Kim Madrid http://kimsstampsanctuary.blogspot.com/
Nichole Gonzales Jaramillo http://nicholesu.blogspot.com/
Kay Jantz http://ktmyldyandlife.blogspot.com
Carmelita Wasson http://carmenacita.blogspot.com/ (you are here)
Cassie Rogers http://lucyslovelies.blogspot.com/
Ruth Norton http://ruthsstampingcorner.blogspot.com/
Subscribe to:
Posts (Atom)
Snowed In
It's like we were destined to not go to school today. I woke up to a beautiful 6 inches of snow in my yard. We are in the lower elevatio...
-
It's like we were destined to not go to school today. I woke up to a beautiful 6 inches of snow in my yard. We are in the lower elevatio...
-
Greetings! Welcome to my blog! And if you are participating in the Ladybug Blog Hop, thank you for taking part in our inaugural blog hop! W...
-
Every time I see a Ring Pop, I sing to myself: If you like it put a ring on it. Anyways. As always, I insisted to my daughter that we...


